Automated incident response to compromised EC2 instances

The Cloud provides us with previously unseen capabilities in proactive security of our architectures. One such highlight is the ability to automate practically anything, a feat possible because everything is virtualised and all resource operations are placed behind an API. This is particularly useful for situations where time is of the essence, such as during a security incident. An example would be responding to compromised EC2 instances. Using CloudFormation, AWS recommended practices and general security principles we can automate the containment stage of our response to such incidents and provision all the required resources and tools for analysis and eradication.
The NIST framework
Before we continue with the recommended practises and the solution we require a bit of context. Incident response lifecycle frameworks outline what should happen before, during and after an incident. One such framework is the popular NIST cybersecurity framework (figure 1).
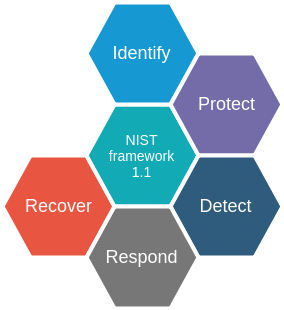
Figure 1 Stages in the NIST framework
The first step in the framework is to identify, meaning to develop an understanding of all business processes and risks associated. This step is critical for the protect stage, where appropriate safeguards are implemented to protect the infrastructure and limit the blast radius. In the detect stage systems and activities are implemented to identify security events in a timely fashion. Respond is the stage that we will (partly) tackle in this blog. It includes containment, analysis and mitigation of the incident. The final stage is recover, which focuses on a timely recovery to normal operations.
The solution we will describe tackles the first part of the response, namely the containment of the impact and the provisioning of resources and tools that are required for the analysis.
The solution
When EC2 instances are compromised we need to carry out a number of steps, first of which is isolation from the rest of the infrastructure. Traditionally this would be done by shutting down the instance after dumping the memory. AWS recommends a different approach, namely to leverage security groups to isolate the instance from everything except a forensic instance. The forensic instance can be SSH’d into from the office by the forensic team to create snapshots of EBS volumes, make memory dumps and analyse the incident at their leisure. After the eradication of the incident the security groups can be restored to recover the instance. To assist the forensic team we will provision the SANS Investigative Forensic Toolkit on the instance. It is recommended to provision a new instance and a new install of the tool for every security incident. So the steps we will automate are:
- Create a forensic security group that can only be accessed via SSH from your office’s IP address
- Create a security group for the compromised instances that allows access only from the forensic security group
- Store all security groups on a per-instance basis in a DynamoDB table
- Replace all security groups for the compromised instances with the compromised security group
- Create a snapshot of all the volumes for each EC2 instance in the compromised security group
- Launch an EC2 instance with forensic tools into the forensic security group
- When deleting the stack, replace the isolated security group with the old security groups from DynamoDB table
The automation will be orchestrated with CloudFormation. CloudFormation is used instead of a scripting approach because it allows for lifecycle management (creation, update and deletion) for all provisioned resources. It makes it clear which resources have been deployed and allows for easy restoration of the instances to their previous state.
The project code can be found on our Bitbucket repository. It consists of a CloudFormation definition of the security groups, the DynamoDB table, the forensic instance and a custom resource to handle the security groups. Let’s walk through the template.
  AWSTemplateFormatVersion: '2010-09-09'
  Transform: AWS::Serverless-2016-10-31
  Description: Template for immediately isolation and forensic investigation of
    compromised instances
We will be using the Serverless transform, also known as SAM – the serverless application model. It will allow us to define our Lambda function and DynamoDB table in shorthand notation.
Parameters:
  VpcId:
    Type: AWS::EC2::VPC::Id
  CompromisedInstanceList:
    Type: List<AWS::EC2::Instance::Id>
  Ec2KeyName:
    Type: AWS::EC2::KeyPair::KeyName
  CompanyIp:
    Type: String
  PurposeTag:
    Type: String
    Default: forensics
We define parameters for the VPC in which our instances are located and a list of the compromised instances themselves. We use AWS parameters so that the CloudFormation console will provide us with dropdowns to select our specific resources. An office IP address is used to only allow SSH from the office. Make sure to create an EC2 keypair beforehand and reference it in the Ec2KeyName parameter.
ForensicSecurityGroup:
  Type: AWS::EC2::SecurityGroup
  Properties:
    GroupDescription: Security group for forensic EC2 instances
    SecurityGroupIngress:
      - Description: Allow SSH from company ip address
        CidrIp: !Sub ${CompanyIp}/32
        IpProtocol: tcp
        FromPort: 22
        ToPort: 22
    Tags:
      - Key: Purpose
        Value: !Ref PurposeTag
The forensic security group consists of a single ingress rule that allows SSH from our office IP address.
IsolatedSecurityGroup:
  Type: AWS::EC2::SecurityGroup
  Properties:
    GroupDescription: Security group that allows only SSH from the forensics group
    SecurityGroupIngress:
      - Description: Allow SSH
        SourceSecurityGroupId: !GetAtt ForensicSecurityGroup.GroupId
        IpProtocol: tcp
        FromPort: 22
        ToPort: 22
    SecurityGroupEgress:
      - Description: Limit outbound traffic to only localhost, removes the default quad-zero outbound rule
        CidrIp: 127.0.0.1/32
        IpProtocol: '-1'
    VpcId: !Ref VpcId
    Tags:
      - Key: Purpose
        Value: !Ref PurposeTag
The isolated security group only allows traffic from our forensic security group over SSH. To deny any outbound traffic we have to specify an egress rule to localhost, otherwise a default rule allowing all outbound traffic is created.
Mappings:
  RegionMap:
    eu-west-1:
      ForensicInstanceAmi: ami-08660f1c6fb6b01e7 # Ubuntu Server 16.04 LTS AMI

ForensicInstance:
  Type: AWS::EC2::Instance
  Metadata:
    AWS::CloudFormation::Init:
      config:
        commands:
            1_sift_download:
              command: "wget https://github.com/teamdfir/sift-cli/releases/download/v1.7.1/sift-cli-linux -P /tmp/"
            2_rename:
              command: "mv /tmp/sift-cli-linux /usr/local/bin/sift"
            3_sift_permissions:
              command: "chmod 755 /usr/local/bin/sift"
            4_sift_install:
              command: "/usr/local/bin/sift install"
  Properties:
    IamInstanceProfile: !Ref ForensicInstanceProfile
    ImageId: !FindInMap [RegionMap, !Ref 'AWS::Region', ForensicInstanceAmi]
    InstanceType: t2.micro
    KeyName: !Ref Ec2KeyName
    SecurityGroupIds:
      - !GetAtt ForensicSecurityGroup.GroupId
    UserData:
      Fn::Base64: !Sub |
        #!/bin/bash
        apt update
        apt -y install python-pip
        pip install https://s3.amazonaws.com/cloudformation-examples/aws-cfn-bootstrap-latest.tar.gz
        cfn-init -s ${AWS::StackName} --region ${AWS::Region} -r ForensicInstance
    Tags:
      - Key: Purpose
        Value: !Ref PurposeTag
Here we provision our forensic instance. We use cfn-init to install SIFT instead of writing everything out in the UserData because updates to cfn-init can be carried out without re-provisioning the instance. This process can take up to half an hour, therefore it is recommended to create one such instance, make an AMI out of it and provision the AMI directly.
SecurityGroupTable:
  Type: AWS::Serverless::SimpleTable
  Properties:
    PrimaryKey:
      Name: InstanceId
      Type: String
    Tags:
      Purpose: !Ref PurposeTag
Our DynamoDB table definition is simple. We want to store a list of security group ids per instance id, so we define the primary key as an InstanceId string.
ApplySecurityGroupFunction:
  Type: AWS::Serverless::Function
  Properties:
    CodeUri: .
    Handler: apply_sg_function.lambda_handler
    Runtime: python3.6
    MemorySize: 256
    Timeout: 60
    Policies:
      - AWSLambdaExecute # Managed policy
      - Version: '2012-10-17'
        Statement:
          - Effect: Allow
            Action:
              - ec2:DescribeSecurityGroups
              - ec2:DescribeSecurityGroupReferences
              - ec2:DescribeStaleSecurityGroups
              - ec2:DescribeVpcs
              - ec2:DescribeInstances
              - ec2:ModifyInstanceAttribute
            Resource: '*'
          - Effect: Allow
            Action:
              - dynamodb:Describe*
              - dynamodb:List*
              - dynamodb:GetItem
              - dynamodb:PutItem
            Resource: !Sub arn:aws:dynamodb:${AWS::Region}:${AWS::AccountId}:table/${SecurityGroupTable}
    Description: Applies the isolated security group to a list of instances
    Environment:
      Variables:
        ISOLATED_SECURITY_GROUP_ID: !GetAtt IsolatedSecurityGroup.GroupId
        COMPROMISED_EC2_INSTANCE_IDS: !Join [',', !Ref CompromisedInstanceList]
        SECURITY_GROUP_TABLE_NAME: !Ref SecurityGroupTable
    Tags:
      Purpose: !Ref PurposeTag
Our Lambda function for the custom resource looks more complicated, but that’s mostly due to the included IAM permissions. We define a python lambda function and give it access to only the operations it needs on EC2 and DynamoDB. We pass the security group id, a comma-separated list of instance id’s and the DynamoDB table name as environment variables.
The python function is too large to completely cover here, but we will highlight the most important operations and some custom resource tips.
signal.alarm(int(context.get_remaining_time_in_millis() / 1000) - 1)

try:
    request_type = event["RequestType"]

    instance_ids = os.environ["COMPROMISED_EC2_INSTANCE_IDS"].split(",")
    isolated_security_group_id = os.environ["ISOLATED_SECURITY_GROUP_ID"]
    table_name = os.environ["SECURITY_GROUP_TABLE_NAME"]

    LOGGER.info(request_type)

    if request_type == "Create":
        isolate_ec2_instances_by_replacing_security_groups(instance_ids, isolated_security_group_id, table_name)
        send_success(event, context, "Resource created successfully")
    elif request_type == "Update":
        isolate_ec2_instances_by_replacing_security_groups(instance_ids, isolated_security_group_id, table_name)
        send_success(event, context, "Resource updated successfully")
    elif request_type == "Delete":
        restore_security_group_for_ec2_instance(instance_ids, table_name)
        send_success(event, context, "Resource deleted successfully")
    else:
        send_failure(event, context, "Unexpected event received from CloudFormation")
except Exception as e:
    send_failure(event, context, str(e))
When the custom resource is created or updated we isolate the instance by replacing the security groups. When you delete the stack the security groups are restored. Make sure to gracefully exit for every possible exception. This means that you should always send a response to the provided signed URL. If you do not your stack will freeze until the custom resource times out, which can take up to 3 hours. Here we include a timer and a widely scoped try-except block to send a response before the function times out and in case an exception is thrown anywhere.
Using the script
Make sure to run cloudformation package to upload the python scripts and replace local paths in the template before you deploy the stack with the AWS Console or CLI. When using the Console all required parameters can be passed using the prompts and dropdowns, while using the cli will require you to use the --parameter-overrides "ParameterName=value" option. An example of the deployment commands is available in the readme of the project. The stack will deploy the security groups, isolate the instances, provision a new EC2 instance start the installation of SIFT on the forensic EC2 instance. Note that if you deploy in a region outside of eu-west-1 you will have to update the RegionMap with the region and the corresponding Ubuntu 16.04 LTS AMI id.
What now?
We have isolated our compromised instances by placing them in a locked down security group and provisioned a forensic instance. The analysis of the instances and eradication of the incident come next. Creating snapshots of the EBS volumes and making a memory dump are standard procedures. ThreatResponse is an open source incident response toolkit that can help you out during this step. Using the installed SIFT tools an analysis of the instances can be carried out to find and eliminate the threat. After eradication the stack can be deleted to restore traffic to and from the instances.
Improvements
We have created a forensic instance in its own security group in the same account as in which the incident occurred. If your company has followed AWS best practises the security team will have their own account from which they can analyse incidents. In this case the template can be modified to accept a forensic security group id as a parameter and use that in the security group ingress rules. Note that you will have to include the account id of the security account in the reference for it to work. Another point of improvement is pre-baking the forensic instance AMI. We have chosen to bootstrap the instance using cfn-init, a process which can take half an hour. Creating an AMI and directly provisioning your instance with it is quicker and highly recommended.
Further reading
For more information on AWS best practises for incident response please watch AWS re:Invent 2017: Incident Response in the Cloud (SID319). For more guidance on the threat removal steps you can read a whitepaper from the SANS institute titled digital forensic analysis of Amazon EC2 Linux Instances.